Ah, the self-built PC. It wasn’t until the turn of this century that computer components were finally affordable enough for the regular Joe and Vlad to build their own, but we made up for lost time in a hurry. The insatiable appetite for newer and better hardware intermingled with the wealth of knowledge that was the internet to produce some wonderful DIY PCs. Oh sure, garish LED lights would peek out at you from some overzealous builder’s case, but at least they were a sign of the close bond shared between a machine and the human that built it.
Modern trends have threatened to leave the custom-built computer behind, what with multifunctional home consoles and constantly connected mobile devices, but there’s still one overwhelming reason to want a good old desktop tower: gaming. The highest possible visual fidelity is still reserved for the PC gamer, with games like the recent Battlefield 3 exhibiting breathtaking graphical detail.
As keen gamers ourselves, we thought it’d be a good idea to show how we’d spend a reasonable sum of money, say $1,000, in the pursuit of such splendorous visuals. This guide will walk you through the dos and don’ts of picking out the right components, before showing you how they all fit together. In the future, we’ll be using the resulting Verge Gaming Rig as a testing platform for other goodies on the desktop hardware front, while also reviewing potential upgrades to keep it in tip-top shape. Today, however, is all about piecing it together and making sure it boots up.
The Components
Before you start assembling any sort of a computer, you’d do well to remember the universal maxim that a chain is only as strong as its weakest link. A typical computer workflow involves (1) taking data from the storage drive, (2) transferring it to memory for more rapid access, (3) sending it in smaller pieces to the central processing unit (CPU) for handling, and finally (4) pumping it out to a display via a graphics processing unit (GPU). Because the CPU and GPU "do all the work," they command the highest order of importance (and price), but you'll never see them performing at their maximum without equally speedy memory and storage or a reliable power supply and motherboard. So, if you’re not keen on creating bottlenecks from the start, make sure to balance your budget so that you can buy high-quality components throughout.
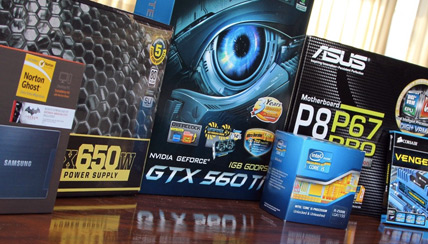
We aimed to do exactly that with the fiscally constrained Verge Gaming Rig, and just managed to scrape in under the $1,000 mark. Pricing of PC hardware actually fluctuates quite a bit, and we were the beneficiaries of quite a few bargains when we put the Rig spec list together over the Black Friday weekend. Thanks to a number of seasonal rebates and a deep discount on the power supply unit, we were able to overspend on the CPU and GPU while still obtaining a Blu-ray player, half a terabyte of storage plus a solid state boot drive, and one of the best motherboards around. Prices have since risen, but if you stick to our rough budget guide above, you should be able to find suitable components that strike the right balance between price and performance.
Thanks for sharing such an outstanding tips on preparing gaming pc because i was looking for it badly.
ReplyDeleteAs always, the content of the post about building a PC for gaming is informative as well as relevant. I am sure many people will benefit a lot by reading it. We, at CompSource, are in the business of supplying electronic and computing products, office supplies as well as computer software and we know the worth of customer awareness. Keep up the good work and we wish you the best for the future.
ReplyDeleteCompsource
gaming pc build
ReplyDeleteWe provide a platform to select and manage the PC parts at once and providing you with the best possible setup and getting assured with the compatibility